How To Blur Objects in Real-Time With Video and Canvas

Confidentiality is a very important part of the modern world. When you shoot a video on your phone in a public place, people who get into the frame will not always be happy with it. To prevent this, faces are blurred or pixelated.
Today I want to share the implementation of such blur/pixelation of video (image) on the web.
What we have:
- browser
- video
- metadata of the video
- array with faces coordinates for each frame (it was got before, using face detection algorithm)
- knowledge about JavaScript, Canvas, and a bit of CSS
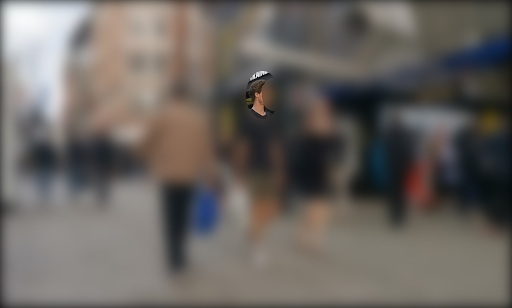
We will blur the faces separately and the whole image, except for the faces.
It looks like this:


Let’s go.
How to Get Video’s Metadata
First of all, we need to get the metadata of our video. To do this visit the site https://gpac.github.io/mp4box.js/test/filereader.html and upload the video.
Open src/constants/video.ts and change params.
framesCount it’s sample_counts in Box View -> Tree View-> moov -> trak ->mdia -> minf -> stbl -> stts

framesDurations it’s sample_deltas in Box View -> Tree View-> moov -> trak ->mdia -> minf -> stbl -> stts

timeScale it’s timescale in Box View -> Tree View-> moov -> trak ->mdia -> mdhd

We will need all this metadata to correctly determine the frame by video current time.
How to Work With Video
We have the video and we want to play it and blur faces on it. But we cannot just use a video tag, because we cannot edit it on the fly and we cannot do something with it in the browser. To do this you can draw this video on a canvas.
The rendering algorithm is pretty simple:
- Create a video element and set the URL to the video
2. Create a canvas element and set its width and height as a video element, get its context
3. Draw a current frame on canvas
* Method
drawImageaccepts interfaces:HTMLOrSVGImageElement|HTMLVideoElement|HTMLCanvasElement|ImageBitmap|OffscreenCanvas, that’s why we can pass the video element and the current frame will draw itself.
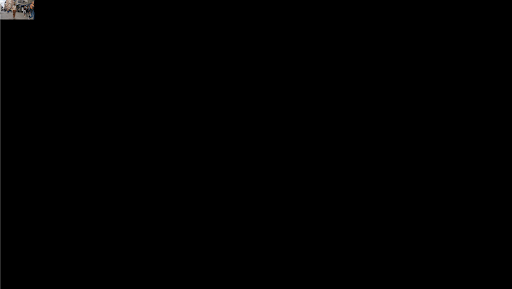
After executing this code, we will see a black rectangle. This is because our video is currently in timeline 0. To see the image while opening the video, you need to do a little hack. When you render a video for the first time, set the current video time to 0.0001.
Now another problem appears: we need to draw video frames during playback.
You can try to subscribe for the timeupdate event, but the result will upset you. It is triggered 4–5 times per second and we will just get a slideshow as a result of rendering.
Our video plays at almost 30 frames per second. Yes, this is not what we expected, let’s try further.
Using a recursive call to requestAnimationFrame, we can more often (60 times per second in at best case) call a method that will receive the time on the video and determine the frame.
Now we have the “player” on the canvas. It remains to learn how to blur faces.
Options which we have for blur:
- Gaussian blur inside objects
- Gaussian blur outside objects
- Pixelate inside objects
- Pixelate outside objects
Gaussian Blur
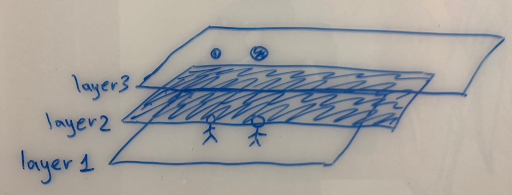
To implement this case, we need 2 more canvases on top of the canvas with the rendered video frame. One is for blurring the entire canvas, the second for cutting out the necessary objects from the blurred canvas by coordinates.
Blurring the entire layer is easy. To do this, you need to apply a blur filter with a given intensity, in my implementation, it is 30. The brightness is used here in order to enhance the blur effect since for bright images you will still see too much of what is under the blur. Then all that remains is to draw our video frame on this canvas.
Now we need to cut our objects by coordinates. We have data about all objects on each frame (with coordinates x, y, height and width, type of blur), so you just need to go through all these objects on the frame and do a little magic.
We form data about the area where the object is located.
It will be a rectangle, but we need an ellipse … Okay, okay, everything will be done now.
With a little school knowledge, we get the radii in height and width and find the center of the ellipse. Draw ellipses and constrain their drawing areas using clip.
The last step. The drawImage method will take different layers depending on how we will blur (inside the object or outside). If we need to blur outside the object, we take the image from the video, if inside, we take from the blurred canvas.
You may have noticed that objects are sorted by the isBlurOut field for some reason.
This is for the case when we have objects with an outer blur on the frame, and objects with an inner blur, and they intersect in some area. In order for an object with an inner blur to be over the image we first need to draw all objects with the outer blur, then draw objects with the inner blur over the image.
Pixelation
Pixelation will be a little more difficult. Let’s first consider a case with pixelation inside an object. We also have 2 layers on top of the canvas with the rendered video. But there is also a small hack here.
On the layer where we blurred the entire canvas, now we reduce our image 12.5 times and paint it. There is a blurIntensity in the downsizeRatio formula so that we can decrease or increase the pixel size.
We get the following result
Now, when we go through all the objects in the frame, we will get this result, because we are drawing ellipses in real size, but we take the picture from the small image in the upper left corner. It turns out we stretch it and get a pixelated image.

It’s magic!

It remains to consider the pixelation of the entire frame. This is a rather difficult operation, and it needs more than a couple of lines of code.
You need to get the imageData from the canvas with the rendered video, it will be a huge array with the description of the image pixels. Every 4 elements in this array describe the RGBA of each pixel.

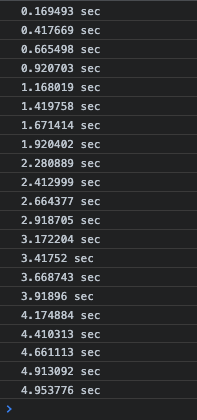
That’s why pixelating the entire frame needs a lot of time.
But not everything is so bad, we do not need to go over this entire array. Depending on the pixelSize (the size of a pixel or in other words, how many pixels we want to combine into one rectangle), that much less we will have to traverse this array.
Running over each pixel that is a multiple of pixelSize, we calculate its position in the array with RGBA representation of the image using the formula:
And then we apply our change to the canvas by drawing that pixel with the pixelSize and it's color:
Do you remember we darkened the image with a filter for Gaussian blur? So, forget about this implementation :)
When we try to pixelate with this implementation it takes a very long time, for one frame it takes some seconds, you can check it by clicking on the Pixelate with canvas filter button in the demo.
But we will not give up on this, we had a little knowledge of CSS, so it’s time to apply it.
Applied :)
You can check the result in the demo by clicking the Pixelate with CSS filter button. It will really surprise you.
Conclusion
Thank you for reading the article till the end. You can find the code on GitHub and see the online demo.
There is nothing impossible, it’s just a matter of time.
P.S. If anyone can tell me how to mix the colors of neighboring pixels when pixelating so that it is not so “rough”, I will be very grateful. OpenCV.js does not offer its overhead for an application.